You’re a skilled bass player.
You know every single Beatles song and you want to show others how to play them.
Where do you go? What do you do?
Take your skills to YouTube, of course!
YouTube is quickly overtaking Google as one of the most used search engines when searching for valuable content. More and more, people are looking for video content, walkthroughs and demonstrations to further their learning of a particular skill or trade.
Bass guitar and music in general are no exceptions.
Putting bass guitar lessons, playthoughs and demonstrations on YouTube is a great way to:
- develop a brand presence and establish yourself as an authority on bass guitar
- establish yourself as a digital teacher as well as to
- supplement your in-person teaching business
I’m sure Scott Devine has some thoughts on this subject, as a matter of fact:
While there are tens of thousands of amateur covers out there where a single camera is framed to capture the player’s right hand and sometimes the left, truly well produced videos and instructional get the most view, shares and comments – bar none.
In this guide, I’ll show you everything you need – and need to know – about:
- publishing your bass guitar lessons onto YouTube
- how to produce high quality, informative and unique music lessons
- a little bit about film theory and the ‘behind the scenes’ tips that go into really quality productions
1. Recording Your Bass Guitar Lesson For YouTube: The Gear:
The Very Least For Getting a Quick Video Up
- Video editing software:
- Your bass and an amp
- A video camera or camera with video shooting capabilities
If you’re on a budget and you can’t afford ‘moderately priced’ or high end equipment for your productions, consider the above bullet points as your best starting point.
Video Editing Software
This is a must.
Without a software, you have no production to upload.
For Mac users, there’s iMovie that comes default with Mac OS and for PC users, there’s Movie Maker.
These programs are functional and get the job done. I’ve worked with a man in the martial arts niche that built his entire business using nothing but iMovie and raw footage adding nothing more than title cards to break up the content and fades to move between sections.
For most things you’re going to do, having a production software that allows for:
- Fades and/or transitions
- Title cards
- Editing shots together
Is all you’re going to need.
Your Bass and Amp
No bass. No amp. No footage.
For now we’re not going to look at using audio interfaces or other tools for recording bass separately.
A Video Camera and SD Card (usually 16GB+)
All things Smart Bass were recorded using a Sony HandyCam camcorder that I purchased for 75 bucks off ebay.
You can get a video camera that gets the job done for a very, very fair price. Here are a few brands of camcorders and cameras to consider if you don’t have one already that can get the job done:
- Samsung F90
- Panasonic HC-V550K
It’s also worth noting that this particular method does not require any additional wires or connectors. All your footage will be (should be) captured on your camera’s SD card and imported on to your computer. This isn’t a live streaming activity where the footage is recorded directly into Final Cut or iMovie or Windows Movie Maker as it’s happening.
I personally like this method for this reason alone. Much less to deal with and the learning curve from thinking of an idea to recording it and publishing it is considerably smaller.
Now I know what you’re thinking: why not use the webcam built into my computer?

You totally can. But I encourage you to think of the quality that a webcam built into my computer delivers first. In fact, I have some experience with this since I recorded a whole 3 hour bass guitar lesson on funk bass using my in-laptop Macbook camera. The quality isn’t terrible, but audio, framing the shot and just getting the results I wanted was damn difficult to do.
There’s something to be said for more high end webcams and GoPros, but on the whole, you want your production to look as complete and, well, quality, as possible and usually these kinds of cameras will limit you in some way.
With a webcam built into the computer:
- The quality on the whole is usually poor and grainy
- No control over sound
- Re-framing your shot usually means having to abruptly move your computer screen around
For selecting an SD card for the camera, bigger is usually better. The worst thing that can happen is that you run out of space when filming.
A good practice with SD cards is to:
- Record your desired footage
- Export the content off the SD card to your moving editing software (backing it up is also highly recommended)
- Re-format (aka wipe) the SD card so when you go to film again, you’re working with full memory. Simply exporting the content off the SD card does not restore the used memory space.
The Very Most For Publishing More Elaborate Videos
- The above list
- An audio interface module (here are some that are around 50 dollars)
- Lexicon Alpha
- Behringer U-Phoria UM2
- Alesis MultiMix 4 USB
- Alesis iO2 Express
- An audio recording software or Digital Audio Workstation (all DAWs have features available for mixing audio)
- GarageBand (free with Mac)
- Audacity (free)
- Logic (paid)
- Reaper (free; paid license)
- Optional: a higher end video production software
If you’re really looking to make recording lessons, walkthroughs or covers on YouTube a big, well-done production then you’re going to need to consider some more extensive gear.
Specifically: an audio interface module and a mixer and higher end video camera.
With a higher quality production, this usually means that the bass and the facetime instruction will be recorded through different channels. The camera will pick up you playing while the audio interface picks up the actual sound of your bass playing.
The benefit of using an audio interface tool rather than just relying on the camera or camcorder to pick up the sounds of the amp is control. The actual sounds of your bass will be picked up and routed through to your audio program or mixing program.
Additional Accessories:
Here are some additional tools that can improve the filming and recording process:
- A tripod (beats placing a camera on a stack of books and you can fine tune it’s position quickly and easily)
- Sunpak 620-520D
- Vivitar VIV-VPT-2457
- Targus Extendable Tripod
- Extra SD cards (never know when something’s going to corrupt)
- External hard drive (everything Smart Bass is placed on a whole other external hard drive. Nothing is stored on my local computer regarding Smart Bass and that especially includes raw footage, supporting graphics and the final product). Here are some worth considering that are 500GB plus:
- Toshiba Canvio 750 GB
- WD 500 GB
- Seagate Expansion 500GB
- WD My Passport 1TB
1.5: The Essentials About Film Production and Producing High-Quality Lessons
What separates good YouTube content from great YouTube content are the details. The details lie not in musicianship, but in film studies. Here are some key ideas about recording footage that you should bear in mind to make an out of this world bass video for YouTube:
1 Determine What You Want Your Viewer to See
Most amateur YouTube videos feature shots that look like this:
That shot, while effective in some regards, is usually out of need rather than desire.
Do you want the viewer to see your hands during the performance?
Your whole body?
Only your face?
This technique is called framing and it’s essential for letting the viewer know what is the most important information to take in. Framing is done in thirds using a concept called Rule of Thirds. The idea is to create balance in the frame and to clearly articulate to the viewer who is the focus of the shot (below).

Ideally you’re going to be the focus of your video, but it still makes sense to understand how you are going to position yourself with relation to your background whether a black tarp or your studio room wall.
2. Sun in Front
When filming, make sure the sun is in front of you.
Why?
Shooting with the sun in front highlights you, the subject, and casts a shadow behind you. If you were to shoot a lesson or a playthrough with the sun to your back, the sun will cast a shadow into the camera and darken you out of the shot.
3. Shoot the Best Quality Possible
Ever seen YouTube videos that look grainy and artifacted? There’s a good chance those videos were not shot with the highest resolution possible or they were shot at a time when that was the best available resolution.
In 2015, HD quality is quickly becoming more and more accessible and the industry norm for video recording equipment. There’s no reason not to shoot the highest quality
4. Consider Frame-in-Frame
Many instructional videos have used this technique extensively. Here’s one video of a bassist explaining how to play bass chords and using a frame-in-frame technique to explain what he’s doing and allow the viewer to see what his hands are doing at the same time:
Using this technique can be a little bit more difficult to do both from a shooting and editing perspective, but the results it gives are phenomenal to the viewer looking to learn from you.
Here’s a fantastic resource for more information on basic video shooting technique.
2. Recording Your Bass Guitar Lesson: Recording, Editing and Publishing Process
You got your gear, you know what you’re going to shoot – now let’s actually shoot some bass videos for YouTube!
If you’re choosing to set a camera on a tripod and your bass and amp as your primary setup, just plug in your bass, turn on the camera and go. With this method, I recommend breaking your shooting up into different segments, ones with you facing the camera and speaking to the audience and others where you’re playing. That way you have shots solely focused on specific points of instruction rather than trying to cram it all into a single shot.
Another point worth considering is voice overs. If you choose to take the approach above, you might want to consider talking over the footage of your hands and bass to provide further instruction as to what’s going on and what the viewer should take away from your video.
A computer microphone should be enough for this or if you have a smartphone that can record audio only (or an app that can do it for you) that will work too. Again – if you have a microphone to devote solely to the cause, feel free to use it.
If you’re looking to capture your bass and your face separately then the setup below is more like what you’re going to need:
*(dashed line indicates optional, bold line indicates must)
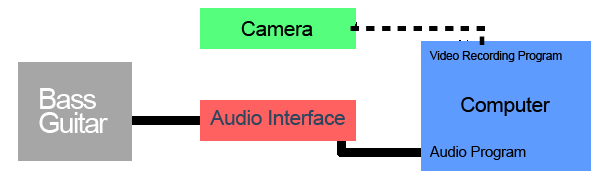
- Connect your bass into your USB audio interface and your interface into your computer and open up one of your audio recording or DAW applications with a new track. You might need to go into your computer’s System Preferences to adjust the audio routing – or where the sound is going to be coming from and where it’s going.
- Turn on your camera and begin recording. If you have a USB connector that allows you to connect your camera to your video editing software of choice and allows for live recording, now would be the time to activate it and go.
A word of caution: streaming like this requires a lot of bandwidth from your computer and can crash one or both of the programs. If you don’t think your computer can handle this much live activity, don’t stream the camera to the computer. Keep the camera record on an SD card and import it to the computer when the session is done.
When you’re done filming and recording your bass, hit stop recording on the audio program. Make sure that the bass recorded properly.
Once all’s said and done, you’re ready for editing!
3. Editing Your Bass Guitar Video
Now that you’re done shooting and you’ve exported the film to your video editing software and moved your audio over to the same file, now you can start editing.
Editing is what will give your video life and character. This will be the time to add the special transitions and title cards to help distinguish your video from others and maximize the viewing experience for your viewer.
How much editing and fixing you want to take care of to add sparkle to your productions is up to you, but for the sake of this video, editing will include:
- Adding title cards/a short introduction
- Color correction
- Audio adjustment/syncing
- Transitions and cuts
Title Cards and/or Short Introduction
For Smart Bass, I added a whole 25 second introduction to my videos – much like you would see to a television show. Your introduction doesn’t need to be nearly that extensive but it does indicate a certain level of professionalism and attention to the product.
A simple title card can just be a 5 second text frame telling the viewer what kind of thing they’re about to watch.
Color Correction
Even basic video editing programs like iMovie have some kind of color adjustment to help add a naturalness back to your production.
Color correction can be used to take some of the reds and unnatural yellows out of your production. When filming, it can be difficult to adjust color and sound levles on the fly. Of course because you’re more focused on filming your product.
Again – while not totally needed, it does help to add a certain level of quality to your work.
Audio Adjustment and Syncing
Now is the time to fix your audio and make sure it matches with what’s going on on camera, provided you did this in 2 separate channels. If you did just a bass, amp and camcorder approach, syncing is not an issue, but making sure your bass isn’t clipping is.
In any movie production software, there is a threshold that shows where audio is clipping, or becoming distorted. Most of these programs require you only to move a level marker up or down to adjust the overall volume of the audio of the footage and/or raw audio.
Use your ear to determine what is the best level for your audio to be at. Naturally, it shouldn’t be deafeningly loud or super quiet either. It should sound natural especially if you’re transitioning from your speaking voice to a section where you play bass.
Transitions and Cuts
Transitions and cuts are simple ways to pull your complete production together.
Cuts mean cutting out parts of your footage that don’t belong there, run over or are generally not needed. Transitions, including fades in and out, sweeps and washes, are used to signal to the viewer where one scene – or in this case idea – start and end.
Well placed cuts and transitions can make your footage more dynamic and moving rather than just having a single piece of footage shot for however many minutes.
All video editing programs have some kind of stock transitions and a scissor tool for cutting and removing parts of the raw footage reel.
4. Publishing
Most movie maker platforms have an immediate export option where you can put your finished product to YouTube instantly.
Give your production one final look over to make sure everything you want is there and hit Export.
Congrats! You’re now on YouTube!
My Personal 2 Cents
Earlier in the days of Smart Bass, I experimented with two ways of recording my bass: one without any fancy recording equipment and another with syncing audio.
Here are my takes on both:
Using the Video Camera to Record Amp’s Sounds: This technique worked quite well for a long time and was how I recorded my Smart Bass lessons (which will come back…someday). With the amp just loud enough, the camera was able to capture the audio without it coming out distorted and fuzzy. In post production, when I actually put together clips and balanced audio, this was where recording like this really paid off. All I needed to do was balance the audio in the master track so it didn’t clip over and I was done.
Recording Bass Separately and Syncing Audio and Visual: This technique was considerably more difficult to do starting off for a few reasons. First, my computer would cut out recording the audio or the visual component because so much bandwidth was being used. The computer was overloading and it took many tries to get what I wanted using my (dated) MacBook. The second was that actually syncing the audio and visual together was a crash course in advanced film production. Going into these projects knowing, literally, nothing about best practices for syncing audio and visual, I found myself re-doing takes because the sync wasn’t working right.
However, there were some significant pluses to recording this way. First, the bass comes in crystal clear. When recorded separately from the talking parts, the bass was able to be EQ’ed and tempered to better fit the overall production. Plus, I was able to clean up any imperfections in the audio with filters and EQ.
Conclusion
Taking your talents to YouTube isn’t hard at all. In fact, it can be done in a few hours on a Saturday afternoon.
If you’re interested in building a name for yourself in bass guitar, then YouTube, more than any other social media outlet, is the best weapon you got. Again – ask Scott Devine, Alberto Rigoni, Miki Santamaria, Nathan East and countless other players.
For bassists aspiring to become teachers, YouTube is a welcomed suppliment to in-person teaching. Videos can be made private to share with students or made public to expand your influence and message all around the world.
At the end of the day, all you really need is a bass, an amp, a computer, a camera and something to say. With those in hand, you’re well on your way to crafting some of the best YouTube content around for a world eager to learn about bass guitar.

- How to Set up a Pedal Board for Bassists - June 16, 2021
- The Best Bass Guitar Effects Pedals Guide You’ll Ever See [INFOGRAPHIC] - April 24, 2020
- The Ultimate Beginner’s Guide to Everything About Bass Guitar Strings - March 20, 2020